Export PDF: Vector Studio Layouts for Print and Sharing
Export PDF: Vector Studio Layouts for Print and Sharing
Need to print your studio layout? Share it with a client? Archive your design for later? StudioFlow Pro now lets you export your canvas as a vector PDF, crisp at any size from thumbnail to wall poster.
Why Vector PDF?
Screenshots are fine for quick sharing, but they’re rasterized - zoom in and you get blurry pixels. Vector PDFs stay sharp at any zoom level.
This matters when you’re:
- Printing large format for wall posters, installation diagrams, or laminated reference sheets
- Sharing with clients who need professional documents they can zoom into for detail
- Archiving designs as future-proof files that won’t degrade over time
- Importing into other tools like CAD software, Illustrator, or documentation systems
How to Export
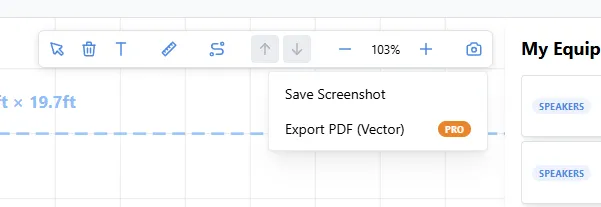
Click the camera icon in the canvas toolbar to open Export Options, then select Export PDF (Vector).
The PDF captures exactly what’s visible on your canvas, so frame up your view before exporting. Pan and zoom to show just the section you want, whether that’s the full studio or a specific rack detail.
Tips for Better Exports
Frame Your Shot
Before exporting, adjust your view to show exactly what you need:
- Zoom out to capture the entire studio layout
- Zoom in to focus on a specific area or rack
- Pan to center the important elements
The PDF exports what you see, so take a moment to compose your view.
Adjust Text Size to Prevent Overlaps
Dense layouts can have overlapping labels. If your gear names are colliding, adjust the text size in Room Settings before exporting.
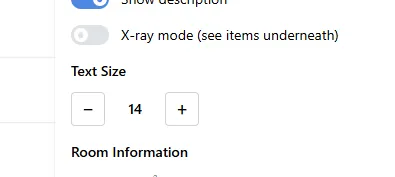
Smaller text works better for zoomed-out full-studio views. Larger text is easier to read when you’re exporting a detail view of a single rack or area.
Pro Feature
PDF export is available to StudioFlow Pro subscribers. The standard screenshot export (PNG) remains free for all users.
Ready to create professional studio documentation? Visit StudioFlow and upgrade to Pro to unlock PDF exports.